Posted on Leave a comment

Australiana? Not Quite!

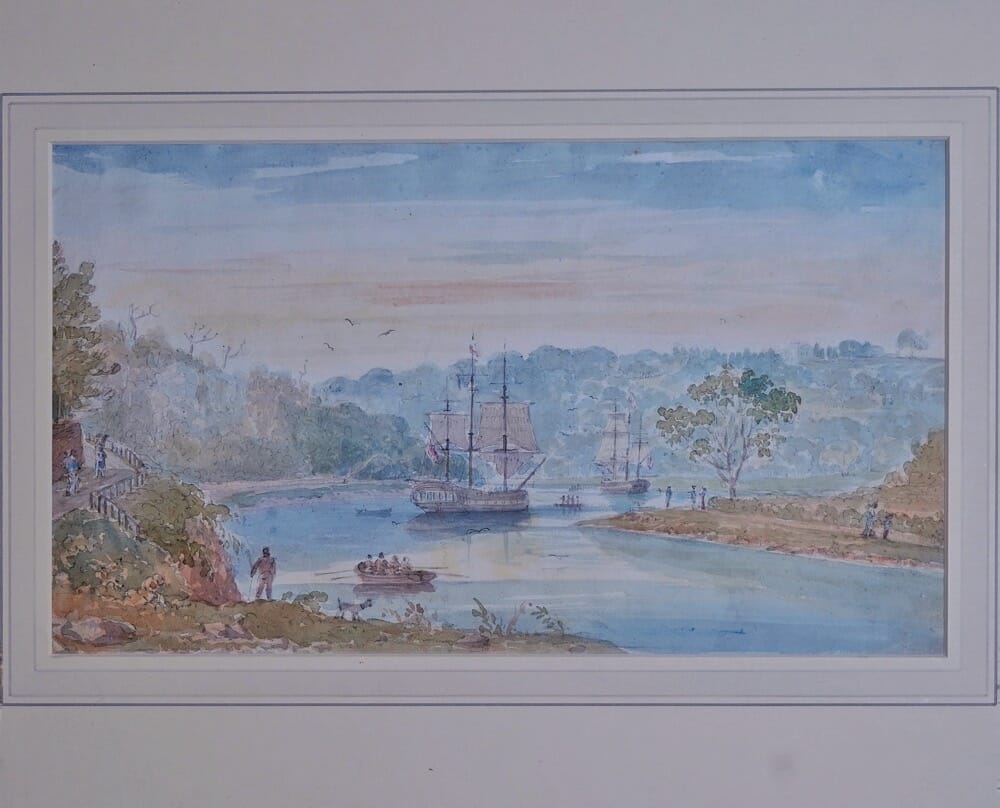
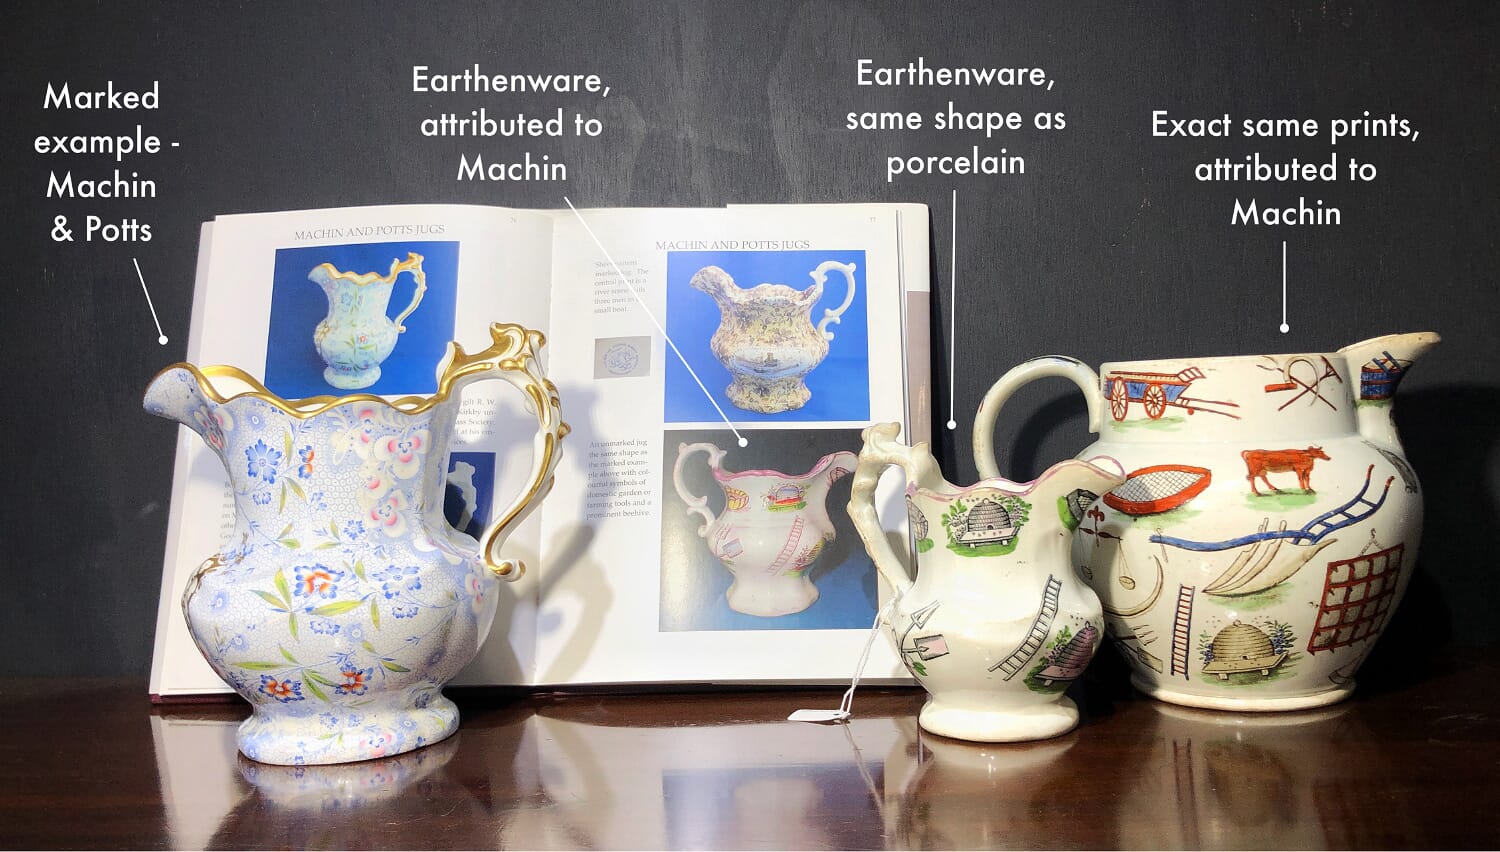
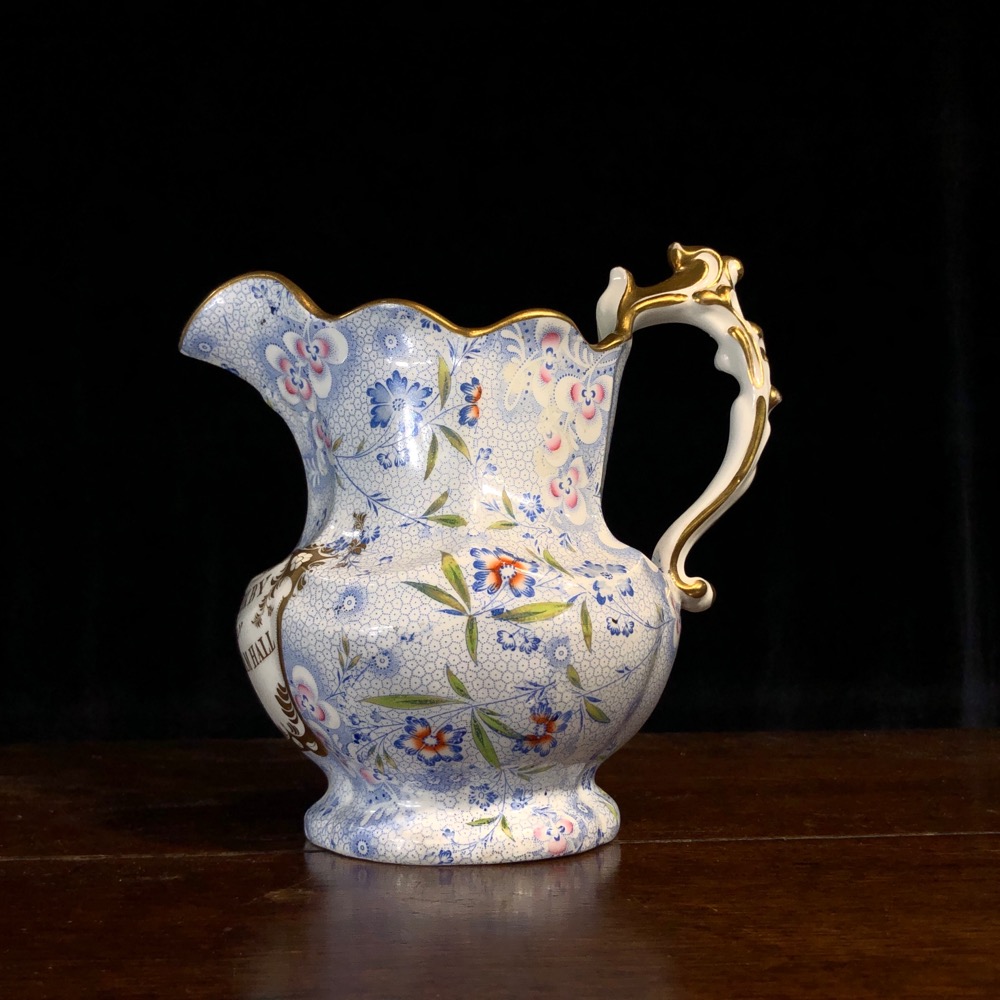
This interesting unsigned watercolour was an exciting recent purchase from a local estate. Exciting, because my imagination ran wild… I could see:

  1. Colonial period ships.
  2. Rather dark people standing up in a ‘canoe’…
  3. The tree so prominently featured looks just like a large Eucalypt specimen, as depicted by early colonial artists.
  4. On the left are a whole row of large, dead trees, birds circling above.
  5. The lack of any town or development, with large ships close to shore.
  6. A Georgian building typical of early Colonial Australia….

Was this an exciting discovery, an early view of the Hawkesbury River, or Tasmania, or somewhere in Sydney Harbour perhaps?

Closer examination was clearly needed. Once deframed, the backing was prised off to reveal the reverse, and a very interesting inscription and date:

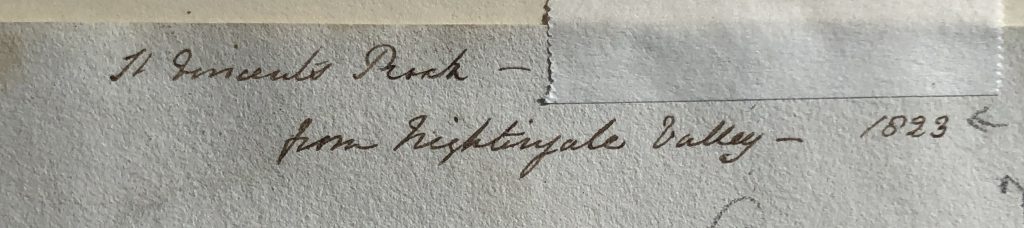
“St Vincent’s Peak – from Nightingale Valley, 1823”

So what is ‘Nightingale Valley’ ? -and where is  ‘St Vincent’s Peak’ ? a quick trip to Google, and all was revealed….
An 1813 scene on a page from Turner’s sketchbooks in the Tate bears a very similar inscription: “The Avon Gorge near Bristol; St Vincent’s Rocks from Nightingale Valley”.  Turner also did studies of the same ship types, being towed by the same row-boats, in 1798.

The view is not Australian, but British. St Vincents Rocks are an outcrop in the high ridge the river Avon cuts through on its way to the sea at Bristol. In this image, the ships are being slowly towed upstream by row-boats towards the docks of Bristol, which lies just beyond the horseshoe-bend and then the Gorge (‘Nightingale Valley’)  through which the river flows to the left. The road cut into the headland to the left is the ‘Portway’, no doubt allowing passage for the horse teams that could be used to tow the sailing ships up the river if needed.

The ‘X’ marks artsit’s location, the \/ his line of sight.

I believe it could be looking upriver towards Bristol, around the position of present-day Shirehampton Park on the left, the first major bend in the river for ships coming in from the sea at the point where the Avon cuts into the high ground. St Vincent’s Rocks would be just to the left of the view, not far from where Isambard Kingdom Brunel designed the remarkable Clifton Suspension Bridge which dominates the gorge today, having opened in 1864.

Leigh Court, built 1814.


The large Palladian style Country House visible on the ridgeline can be pinpointed on a map today, and is Leigh Court, a gem of Georgian architecture built in 1814, and today a popular wedding venue.


Certainly a long way from the gumtrees of Sydney Harbour…..


See this interesting piece on our website here>>

Posted on Leave a comment

John turns 80!

A special milestone occurred this week, with John Rosenberg, founder of Moorabool Antiques, turning 80.

John Rosenberg turns 80, 2019

Back in the 1950’s, a young John Rosenberg could have never believed he would be proprietor of a business such as Moorabool was to become. His first purchase at the age of 12 was a Staffordshire Swan Inkwell – still treasured to this day!

Staffordshire Swan Inkwell

He haunted the few places in Geelong that had Antiques, and from their owners began to learn the vast amount there is to know about the past – something he is still pursuing every day of late, pouring through our reference books for the more obscure patterns & shapes contained in the huge collection we are currently processing…..

John has seen huge change in the Antiques Trade, from his very first Antique Dealers Association fair in 1959 – the second ever held in Victoria– through 59 consecutive years exhibiting, including the boom years for Antiques in the 1980’s-90’s…. fast-forward to 2019 and there was no Dealers Association Antique Fair held, breaking his 59-year consecutive stretch… a reflection on the shrinking Antiques Market.

These days the business is quite, and prices are low – and that, says John is exciting.

“For anyone buying Antiques, there has never been a better time. In all my experience, most items are cheaper today than they were when I began, and have not been this affordable in any of the years since…” 

In other words, now is the perfect time to buy!

John has never lost his fascination in past products, hand-made with care and attention. And the variety is seemingly endless.

“Always something to discover, something ‘New’ in Antiques that I have never seen before…” 

“I still work every day – if you call this work!”

We got together some friends & family in the Reference Library of Moorabool to celebrate his 80th party.

Some wonderful in-house catering resulted in a very trendy ‘Grazing table’ – using antiques in a very encouraging way!

The cake was always a concern -clearly a ‘normal’ cake would not do for this momentous occasion – and so a Willow Pattern design was conceived – echoing the one from his 70th birthday, but in this case, brought to life with a ‘crash’!

Willow Pattern Plate Cake

Those cracks are an Antique ceramic dealers worst nightmare, and slicing it up & eating it was something of a relief!

A good time was had by all, and thanks to all who came & sent their best wishes – and have done so since.


Posted on Leave a comment

Machin & Potts… a detective tale

Machin Attribution

There are two pottery jugs in this week’s ‘Fresh’, sourced from the same amazing collection of early 19th Century pottery & porcelain as all the similar pieces we have released recently. Our research team had been working overtime (thanks John!) and poured through every book in the library to help identify the vast number of items that have come in.

This jug has a very similar example illustrated in the book ‘British Jugs’, marked for a Staffordshire company called Goodwin. Bridgewood & Harris. Case closed, maker identified…? not so fast!

There’s another example, in our collection, which bears an uncanny resemblance, although in porcelain rather than in pottery. Many manufacturers made the same shape in both bodies, the pottery being much cheaper to make, and therefore to sell, than the porcelain. This other example is from the small firm of Machin & Potts, which has until recently had very little documentation. Fortunately two collectors, Bill Thom and Phillip Miller, spent a good deal of time collecting and researching the firm, and published the definitive book in 2008. This exact same porcelain jug is in the book, identified by the unique dedication to a certain ‘R.W. KIRKBY of THRENTHAM HALL’.

Machin and Potts mark

This leads to an interesting detective trail of identification, involving a ladder, a beehive, a basket, several farm implements and a hen & rooster!


In the above image, you see the first clue; the porcelain jug. The illustration above reveals it to be the exact same piece of marked Machin. Below this (hidden by our jug) is another example with a pattern no. that conforms with known Machin teawares. You can see the tip of the handle though the handle-hole of our jug – it is an exact version of the smaller jug we have, shown to the right in the above photo. This jug has the amazing ‘scrap’ printed decoration, and a distinct pink lustre rim – both appear on the illustrated jug, giving us a close linkage; the small jug we have is also now attributable to Machin.


Then comes the ‘big one’ – the large jug with ‘scrap’ decoration. Its form is the ‘Dutch shape’ , a perfectly normal & popular shape that is very difficult to identify… usually. In this case, we have the prints, and a side-by-side comparison of the same items proves most interesting…. basically, they’re not just ‘similar’, they are identical, right down to the little flaws in the printing plate that have been replicated. Note- in the photos there is some distortion due to the curved surface of the jugs.

[metaslider id=64347]

The person who printed the smaller jug used the exact same printing plate as the larger jug, therefore most probably worked at the same factory:

Machin!

Footnote:  Thom & Miller note “other makers including Goodwin, Bridgwood and Harris … made very close versions to this shape”   – we trust the above identification of the prints used justifies our attribution!

See all our Machin offerings, including these jugs, here >>


Posted on Leave a comment

The Boyd ‘Medieval’ chess set

A fascinating and most probably unique creation is also the most modern item in stock at Moorabool – dating to the 1960’s, it is an Australian Pottery ‘Medieval’ chess set, by David & Hermia Boyd, members of the remarkably artistic Boyd family.

Medieval Chess set by David & Hermia, 1960’s
David & Hermia Boyd Chess set
David & Hermia Boyd Chess set board

David Boyd (1924-2011) was born in Murrumbeena, Victoria, the third son of Merric and Doris Boyd. He met Hermia when she was decorating pots for his brother Guy Boyd in his Sydney studio. Married in 1948, they headed over to London in 1950, where they potted & painted for the next 5 years. After returning to Australia for a few years, they were off to Europe again in 1961, where they lived & worked in Rome and London, returning to Australia in 1975. It was probably during this trip they created the chess set, perhaps as a personal piece or a special commission. Certainly, it was not a commercial production and appears to have been only on the market once before, at Christie’s, Melbourne, in the 1980’s.

British Museum – Lewis Chessmen, 12th century


The board has wonderful mottled glazes, giving it an ancient feel, and is made up of four ’tiles’; these have firing fissures and cracks, and are mounted on a wooden backing with beading edge, all finished with a limewash. This work is probably by the hand of David, and is reminiscent of his other ‘Medieval’ sgraffito wares.

The set is very reminiscent of the ‘Lewis Chessmen’, a part set of 12th century Norwegian game pieces made from Walrus Ivory, discovered in the Outer Hebrides in 1831. Some of these would have been on show in the British Museum in the 1960’s when David & Hermia were in London.


[metaslider id=”45134″]


The pieces are all individual creations, and are probably the work of Hermia. It may just be my imagination, but one of the knights appears to have disguised initials….  ‘H / B’.


[metaslider id=”40842″]


See more on this remarkable set here >>

Posted on Leave a comment

Sir John Franklin portrait discovery, c.1828

Sir John Franklin silhouette

An exciting find at Moorabool is this portrait silhouette of Sir John Franklin.

His name is very familiar in Tasmania; as stated on the back of this newly discovered portrait, he was Governor there 1837-43, and his name appears across the state with a town on the Huon River, and a major river which narrowly avoided being dammed, an electorate,  plus his splendid statue in the middle of a fountain in Hobart.

This silhouette is a majorly important piece, being a very personal depiction for which he would have had to sit; a frontal painted portrait could be mocked up from a printed image, and often was of famous people (for example Napoleon). However, a profile must be drawn from life, and this portrait has a secret beneath the image in the form of an original ‘trade card’ for the artist; in this case, George Atkinson, ‘Profilist to His Majesty’  (George III) at no. 40 Old Steine, Brighton. What is exciting about finding the trade card is it allows us to date the piece to 1822 -1828, the years he operated out of that address.
During this time, Sir John must have visited and sat for his profile to be taken. Not for long – George Atkinson prided himself in his speed, advertising a sitting took ‘less than one minute’. One can imagine Sir John dropping in, dressed in his Navy uniform, before striding out a minute later to take the airs on the promenade at Brighton!
These portraits were the equivalent of a studio photograph today. Atkinson charged 10s 6d for a detailed profile, a not so insignificant amount. So who did he have a portrait done for – to whom was this portrait gifted?
A look at his activities 1822-28 provide the most likely answer. He was quite an active Navy officer, spending some time exploring the Arctic reaches above Canada, but still found time to marry in 1823 to a Romantic poet named Eleanor Porden. They had a child in 1824; she died in 1825. He was off on another Arctic expedition shortly after, returning to England in 1827. Was it at this time he visited Brighton, for a little R&R? Perhaps having a portrait done to give to a special friend of his late wife, Jane Griffin…. and perhaps it worked, as they were soon married, in November 1828. She was the fascinating strong-willed ‘Lady Franklin’, who came to Tasmania in 1836 and is considered by some to have been the driving force behind Franklin’s time as Governor. This portrait came from a local Victorian source, and perhaps came to Australia with The Franklins in 1836, only to be left behind in 1843 when they returned to England.

Jane Griffin, later Lady Franklin

Internationally, Franklin has recently been of increasing interest due to his exploits after he left his position in Tasmania. This interest stems from the tragedy of his final adventure, his quest for a North-West passage through the Arctic ice above the American continent, a short-cut to the Pacific ocean that would have had great consequences for trade – if it had existed at the time. Ironically, with ‘global warming’ ships have recently been able to pioneer this northern route between the oceans – but when Sir John attempted it in 1845, he found no way forward. No way back either… surrounded by thick sea ice, he and his two ships on the expedition, Erebus and Terror were stuck. They were well equipped for such an incident, but a decision was made to try and walk out; all men and their commander disappeared in the Arctic wilderness, along with the ships. They had three years worth of provisions, but once that time was up the British Admiralty offered a £20,000 reward for resolution. Expeditions were mounted, but only a few graves and cryptic clues were found; Sir John Franklin and his 128 men had perished.

The recent interest came as a result of the excited announcement from Parks Canada in 2014 – they had discovered the wreck of Erebus. Two years later, their search revealed the Terror. Both are in relatively shallow and accessible waters, and dives on them have been nothing short of sensational; the state of preservation in the low temperatures is superb.

HMS Erebus, on the seabed 2014 in this side-sonar image from the moment of discovery.

An announcement in April 2018 by the British Government has resulted in the British ‘gifting’ the remains to Canada; an exciting future awaits as plans are proposed to recover items from these incredibly important ships – indeed, perhaps even the ships themselves!

We are thrilled to have discovered this previously unknown silhouette portrait of Rear-Admiral Sir John Franklin.

POA

See the item in our stock here >>

Posted on Leave a comment

Lest We Forget: Anzac memories

Simpson & Donkey, Bronze by Peter Corlett 1988

Today is an important one in Australia; the 25th of April 1915 was a ‘coming of age’, the first military action as an independent dominion. While the troops of the young nation didn’t achieve what they set out to do, and 8,709 didn’t return, it resulted in a sense of pride in those who did return with tales of valor and mateship. Even in the midst of the military disaster it turned out to be, a sense of being ‘Australian’ arose. Although the last of the troops who served at Gallipoli have passed on, all around Australia the younger generations gather at dawn, remembering the sacrifice and bravery of past generations.

Dyson Anzac Print 1927
Will Dyson ‘A Voice from Anzac’ Print 1927   -see it here>

This image by Will Dyson, the first official War Artist for Australia, illustrates the sentiment 12 years later; two soldiers in full kit sit by the sea, but are just ghosts on closer examination with the coastline visible through their bodies. The caption reads “Funny thing Bill- I keep thinking I hear men marching!”  – the memories of those who didn’t return are still sharp. This cartoon appeared in the Herald on Anzac day in 1927, and proved to be so popular another print run was ordered, on better quality paper and in a limited number. These ended up in various RSL clubs around the country, and it was perhaps in one of these that the collection of signatures along the lower edge were collected. While it has Dyson’s own pencilled signature, the others are unexpected and remarkable: they are all winners of the Victoria Cross in WWI, with one exception: Lieutenant General Sir John Monash. It is an apparently unique  tribute to the Gallipoli spirit, put together by soldiers who were there.

Dyson Anzac Print signatures
Dyson Anzac Print signatures – Will Dyson, A Jacka W Dunstan

Dyson Anzac Print signatures
Dyson Anzac Print signatures – J Monash, R C Grieve, G M Ingram

Will Dyson was born in 1880 near Ballarat, and was self-taught as an artist. He obtained work with various magazines as a satyrical illustrator, and became good friends with Norman Lindsay, marrying his sister Ruby. He spent the war years in England, and volunteered his skills to the Australian Imperial Forces “to interpret in a series of drawings, for national preservation, the sentiments and special Australian characteristics of our Army”. In this capacity he travelled to the Western Front in 1916, and was appointed the first official war artist in 1917. He was wounded twice as he proceeded with the troops, recording a very human side of the great conflict. He returned to Melbourne in 1925 where he worked at the Herald. During this time he produced the following print (1927) , and returned to London in 1930 where in died in 1938.

The original drawing in the Australian War Memorial, Canberra. Moorabool is pleased to offer the above work.

Simpsom & his Donkey - Peter Corlett 1988
Simpson & his Donkey – Peter Corlett 1988

Also in the Australian War Museum is another dramatic depiction of Australian Anzac spirit, the life-size bronze  ‘Simpson and his donkey’, by ‘Peter Corlett (1944 -). This work was commissioned by the Government, and installed on Anzac Day 1988 at the front of the War Memorial in Canberra. At the same time, 12 smaller versions were made & sold, and Moorabool currently has one of these.

[metaslider id=41523]

John Simpson Kirkpatrick was actually a British merchant sailor who jumped ship to enlisted in Fremantle, using his middle name. On the first day of his arrival at Gallipoli as a stretcher bearer, he found an abandoned donkey he named

Simpson & his Donkey Duffy

Duffy.  The donkey helped Simpson carry the wounded who were still able to ride. This grainy photo was the inspiration for the legend, showing a wounded soldier being assisted by Simson down to the beach for evacuation to the hospital ships moored offshore.


We are honoured to have these reminders of the struggles that helped form Australia. I’ll finish with a group of prints that give a unique ‘Australian’ image to the warfare of WWI 100 years ago:

[metaslider id=41521]


[yith_wc_productslider id=41512]


Posted on Leave a comment

A Ming Dynasty Dragon roof tile, 16th – 17th century

Ming Rooftop tile Dragon
Ming Dynasty Roof Tile

A fresh item to Moorabool is this quirky Ming Dynasty roof tile figure. As the name suggests, these were part of the roof decoration on Chinese buildings.

Ming Dynasty Roof Tile


Many different ‘characters’ appear as roof tile figures, each with a symbolic purpose. Our Dragon is actually a water dragon, and he would have been the chief character in a whole line of little figures down the crest of the roof junction. He was given this position due to his ‘wet’ nature: he would ensure protection from fire for the wooden building beneath.

Ming Dynasty Roof Tile
Ming Dynasty Roof Tiles at Beijing’s Forbidden City
Ming Dynasty Roof Tile
A similar Dragon, Forbidden City


Ming Dynasty Roof Tile

A very familiar installation of a similar dragon is in the Forbidden City in Beijing. On the roof of the Hall of Supreme Harmony (circa 1406) you will see 10 small figures (the more figures, the more important the building) – and at their top, a larger dragon – complete with the same toothy grin as our example. He’s done a good job as fire warden, protecting the structure for the past 400 years…. Scattered around the acres of other buildings in the complex are numerous other examples of the same.

Forbidden City Rooftop Dragon

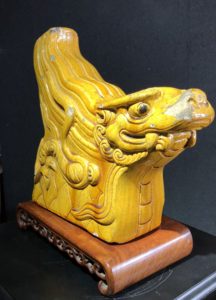
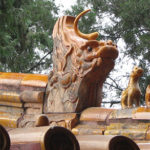
What’s interesting are their intact  ‘horns’, missing from ours. Examine our head and you will see the two holes they were once inserted into.

Another pair reside in the Victoria & Albert Museum, SouthKensington (London). Their pair entered the collection in 1912, and could well be from the same building as ours – all the moulded details are identical, as is the glaze, the only differences being due to the inscribing of details.

One of a pair in the Victoria & Albert Museum, London


See our toothy character here >>


Posted on Leave a comment

A scroll with a tale; an Ethiopian Coptic Scroll brought back from the Abyssinia Expedition, 1868

Ethiopian scroll

An interesting recent arrival at Moorabool is literally Magic…..

EthiopianScroll
The Ethiopian Magic Scroll, 19th century or earlier

This curious artefact came from an elderly local lady, who challenged me: ‘I bet you don’t know what this is’ and was amazed at my guess of an Ethiopian magic scroll. I had never held one, but knew of them. She went on to explain how an ancestor had taken part in the Abyssinia Expedition and brought it back with him in a tin. The family had kept it as a curio; now she was the last of her family, with no-one to pass it on to.

The ancestor was a British Army captain, and was one of the 13,000 British and Indian soldiers involved in a campaign to Ethiopia in the 1860’s. Ethiopia, then known as Abyssinia, was a mythical place, the home of the Queen of Sheba from biblical days, and the mythical Prester John in the middle ages. Legend tells of a son being born from the meeting of King Solomon and the Queen of Sheba, Menelik. Certainly Christianity spread there very early, by the 4th century AD. Their first bishop was consecrated in Alexandria, and it is the Egyptian Coptic version of Christianity which survived until the present day in the remote highlands, despite waves of Muslim settlers along the coasts.

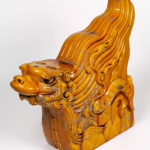
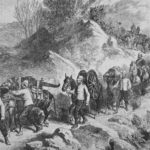
The Abyssinia Expedition has been described as “one of the most expensive affairs of honour in history”. The honor of course was the British Empire’s. They were caught up in a difficult situation in a far-off foreign land; a local ruler, Tewodro,  had sought help from the powers of the day to consolidate his power over present-day Ethiopia  – in particular, he was after technology, realising that modern weapons would swiftly defeat his tribal competitors. He tried Russia, Prussia, Austria, the French, and the English. Queen Victoria sent

The Abyssinian Prisoners 1868

him a silver pistol, but no help. Disgruntled by lack of interest in his campaign, he snatched a visiting missionary; when a party set out to seek his release, they were captured as well, and imprisoned in his fortress of Magdala, deep in the Ethiopian highlands. Anyone sent to negotiate was added to his hostages, including the British consul: he ended up with dozens of prisoners.

Queen Victoria had had enough; the British Empire had been mocked! She announced the decision to rescue the hostages on 21st August 1867. While similar hostage rescues in our present age often include helicopters and quick extractions from hostile lands, for the Victorians it was a massive effort. Sir Robert Napier led the expedition, which landed in the Gulf of Zula in December 1867. Magdala was only 640km away, but it was a waterless hostile badland, and took 3 months of marching. Imagine, 13,000 soldiers with 26,000 helpers to look after them using 40,000 animals…. including 44 Indian elephants to carry the large cannon!

Once there, action was swiftly over. Tewodro’s troops caught the British by surprise on a platteau, and swarmed down from their hilltop positions; the well trained British quickly responded, with the inevitable massacre of the tribal attackers, many with just spears agains the superior British guns. A few days later they were able to bombard the fortress, blow the gates, and swiftly took over. On entering the last stronghold, they found Tewodro had taken his own life – with the silver pistol given as a gift by Queen Victoria!

The soldiers destroyed the stronghold, setting it on fire. The Christian Coptic church was looted, with large gold & silver crosses being taken along with many religious works – including scrolls such as the one we are discussing. They were regarded by the Victorians as ‘magic scrolls’, evidence of superstition and ‘whitchcraft’, and therefore worthy of a place in any Cabinet of Curios.

EthiopianScroll

For the Ethiopians, they were believed to hold protective and healing powers, and were carried by the owner at all times. These were inscribed in ‘Geez’, the liturgical language of the church, with prayers, spells and/or charms which offered protection to their specific owner – to undo spells, restore health, combat sterility and even ward off demons. The text was often taken from sacred books such as Gospels and because of this, the scrolls were tolerated by the Ethiopian Church in spite of their connection to magical practices.

The process would begin with the selection and sacrifice of a particular animal. The owner would bashed in the animals’ blood as part of the process of purification. Three strips of parchment were then made from the skin of the animal and stitched together to form a single scroll equal in length to the height of its owner – ours is 135cm.

During crisis, these scrolls were carried on one’s person, and were kept close when sleeping to ensure protection. When the British Soldier acquired this 140 years ago, he protected it in a airtight tin, meaning this fascinating artefact has survived in remarkable condition.

See the item in our stock >>

[metaslider id=”40915″]


Posted on Leave a comment

Welcome!

Welcome to the all-new Moorabool Antiques home on the web. We have been busily preparing since the start of the year, and are pleased to introduce our new site.

It’s been designed to make browsing our immense stock a pleasure for you, our online customers.

Right from the front page, you’ll find lots of different experiences – but hopefully familiar to regular visitors from our last site…. only Better and Easier!

We now have a logical menu populated with all the different groups of stock, allowing you to find your are of interest and see what we have to offer.

A new ‘search’ method is in place, far superior to the previous site, and you can access this on any page. Search for your interest and you will bring up pages on that subject to browse.
The final way to browse is via our ‘Collections’. These are ever changing and developing, and involve us defining a topic – for example ‘Middle Eastern Antiques’ – and grouping related pieces into a Collection Gallery. You’ll find access to this via the menu ‘Collections’ at the top of each page. 
The other major addition is our ‘blog’. The currently featured blogs will appear down the left side of our homepage, and also on their own archive page. These are in-depth discussions of pieces or topics, and feature superior illustrations of their subject.

A series of new Customer Features will appear over the next while.
Today, we introduce the ‘Shortlist’. On any stock item’s page you will see a button titled ‘Shortlist’. This is a handy way to

make a list while browsing, and is great for comparing items side by side. As you add items, the will appear to the right in a list, along with a button ‘Compare’. Click this and you will bring up all the details and pics of the items you have ‘shortlisted’, side by side. If you’re wanting to save items, there’s a ‘wishlist’. These save to an account you make – we strongly recommend making an account, which will save your wishlist and your shipping details for any purchases. It will also keep track of these for you!

Drop in to our site and have an explore. There’s an ‘enquiry’ button on each page, and please feel free to send a message. As it is a new setup, if something doesn’t quite work or seem right…. let us know!

Posted on Leave a comment

Samuel Alcock

Samuel Alcock vases

There’s a certain style that defines the late Regency and early Victorian era, when the designers looked beyond the classically inspired Regency designs and re-visited the curves and flourishes of the Rococo.  One manufacturer who excelled at this was Samuel Alcock.

He began his own production of pottery in 1828 at Cobridge, and opened another works at the Hill Top Works in Burslem, which he took over from Riley. Some time in the 1830’s he began to manufacture porcelain as well as pottery, and went on to produce a wide variety of pieces decorated by printing, painting, and elaborately applied 3d flowers.

The porcelain is a beautiful bone china mixture which is distinctive enough to be identified on its own when compared to contemporaries such as Daniels or Minton. Decoration included bold ground colours, well painted fruit & flowers, and finely detailed scenes, embellished with good gilding. Marks are rare (on porcelain in particular) but a pattern number will usually be evident. These numbers quickly increased, and a fractional pattern number was introduced,  ie. 1/1234.
Samuel died in 1848, having built up a reputation as one of the better manufacturers of the Staffordshire Potteries. His firm closed the following decade.

[yith_wc_productslider id=”40724″ z_index=””]